MCU는 CPU나 GPU와 다르게 낯설지만, 가장 많이 사용되는 반도체 중 하나다. ST 시스템 솔루션 랩의 유지 카와노 매니저에게 MCU의 활용성과 가능성이 얼마나 큰지 들어보자.
GNSS 기능 확장 보드로 위치 정보 모니터
기본적 위치 좌표 애플리케이션 탑재 보드 이용
명령어 번호를 입력하면, 원하는 데이터를 표시
[편집자주]일반적으로 반도체라 하면 컴퓨터의 CPU와 메모리처럼 일반인에게 익숙한 반도체를 떠올리기 마련이다. 반면에 전자제품 구동을 위해서 핵심 반도체로 쓰이는 MCU(Micro Controller Unit)의 경우 일반적으로 우리가 쉽게 접하는 모든 전자제품에서 사용되고 있으면서도 일반인에게는 아직 낯선 반도체다. 이런 MCU가 최근 반도체 부족 사태로 인해 언론에 오르내리며, 일반인들에게 주목받기 시작했다. 이에 본지는 MCU 반도체 전문기업인 ST마이크로일렉트로닉스의 유지 카와노 매니저의 연재기고를 통해 MCU에 대해 전문적으로 알아보는 자리를 마련했다.
.jpg)
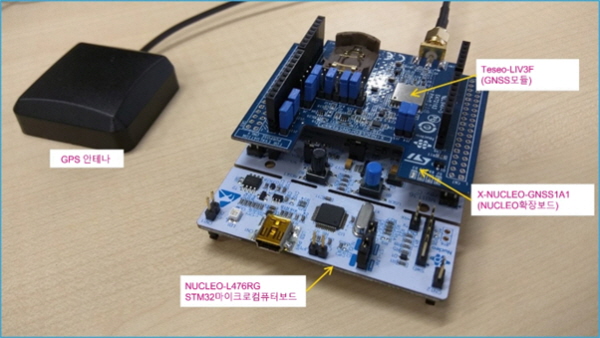
ST마이크로일렉트로닉스의 범용 32bit 마이크로 컴퓨터 개발 보드 ‘NUCLEO-L476RG’와 GNSS(Global Navigation Satellite System : 세계 위성 항법 시스템) 측위 IC를 탑재한 기능 확장 보드 ‘X-NUCLEO-GNSS1A1’을 사용하여 자신의 위도·경도 위치를 모니터해 보겠다.
확장 보드에 탑재된 차재용 GNSS 측위 IC는 ‘Teseo III’라 하며, ST의 GNSS 모듈 ‘Teseo-LIV3F’로 설치돼 있다. 이번에는 터미널 툴을 경유해 GNSS 데이터를 살펴보겠다.
■ 우선, 하드웨어를 준비
NUCLEO-L476RG와 X-NUCLEO-GNSS1A1을 접속. 다른 STM32 Nucleo 보드도 선택할 수 있지만, 여기에서는 기본적인 위치 좌표 취득 애플리케이션(GetPos_XX)이 이미 마련되어 있는 L476을 선택한다.
X-NUCLEO-GNSS1A1에 동봉된 안테나는 동작 확인 시에 접속한다(여기서는 미접속 상태여도 OK).
■ 다음으로 소프트웨어를 준비
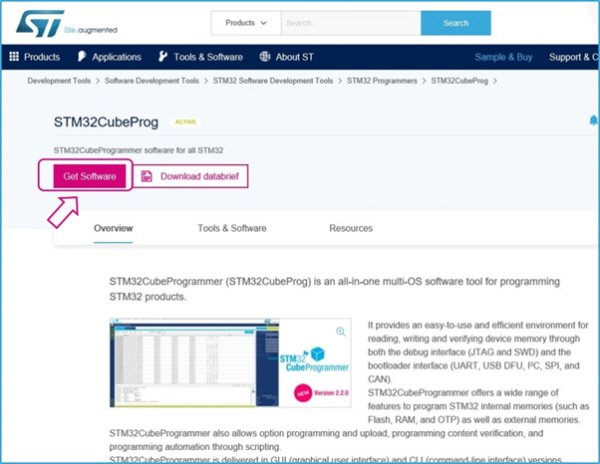
○ STM32CubeProgrammer 인스톨(이미 인스톨이 완료되었다면 건너뛰기)
처음으로 PC에서 STM32NUCLEO 보드를 사용할 경우, STM32CubeProgrammer(이전 툴: ST Link Utility)를 인스톨하여, COM 포트 드라이버 등을 준비해 둔다(이 포스팅에서는 STM32CubeProgrammer는 사용하지 않으나, 드라이버가 필요하다).
이 툴은 STM32의 보드 상에 펌웨어 프로그램을 기록할 때 필요하다. 다운로드 파일을 푼 후, 실행 파일을 열어 안내에 따라 인스톨한다.
이미 STM32CubeProgrammer를 인스톨한 경우, 이 작업은 할 필요가 없다.
STM32CubeProgrammer
○ 동작용 소프트웨어 준비
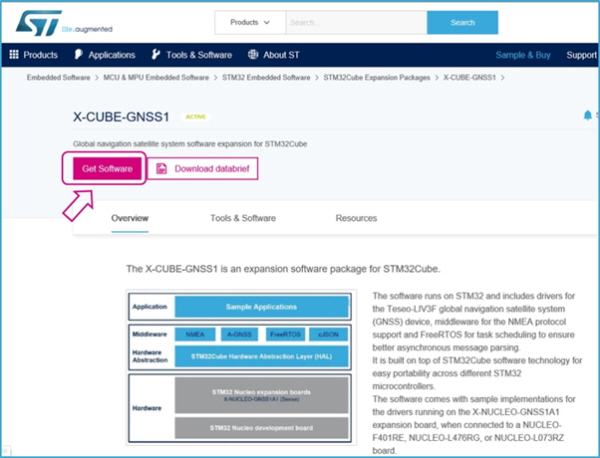
ST마이크로일렉트로닉스의 웹사이트에서 다음의 소프트웨어 파일을 다운로드한다.
X-CUBE-GNSS1
다운로드한 파일을 풀면, 바로 통합 개발 환경용 작업 폴더가 생성된다. 아래의 폴더에 이번에 사용할 시연용 프로그램 파일(바이너리 파일)이 준비되어 있으므로 이를 STM32 Nucleo 보드에 기록한다.
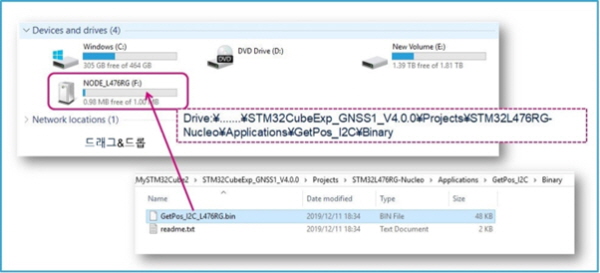
Drive:...\STM32CubeExpansion_GNSS1_VX.X.X\Projects\STM32L476RG-Nucleo\Applications\GetPos_I2C\Binary
PC에 STM32 Nucleo 보드를 USB로 접속하면, 드라이버가 정상적으로 작동할 경우, ‘NODE_XXXX’라는 디바이스가 인식된다.
기록하고 싶은 파일(바이너리. *.bin)을 대상이 되는 STM32 Nucleo 보드에 드러그 & 드롭한다.
여기에서는 GetPos_I2C.bin이라는 프로그램 파일을 NODE_L46RG에 복사한다(이렇게 하면, STM32 마이크로 컴퓨터에 펌웨어 기록이 완료된다).
■ 동작 확인
○ 셋업
STM32 Nucle 보드와 X-NUCLEO-GNSS1A1 보드를 Arduino 커넥터를 경유해 접속한다. X-NUCLEO-GNSS1A1 보드 상의 안테나 커넥터에 동봉된 안테나를 접속한다. 준비되었다면 PC에 USB를 접속해 준다.
안테나 본체는 실외 또는 하늘이 보이는 창 쪽에 설치해 준다.
○ 터미널 툴을 기동
PC에서 동작을 확인하기 위해 시리얼 포트를 이용한다. TeraTerm 등의 터미널 에뮬레이터 툴을 사전에 PC에 인스톨한다.
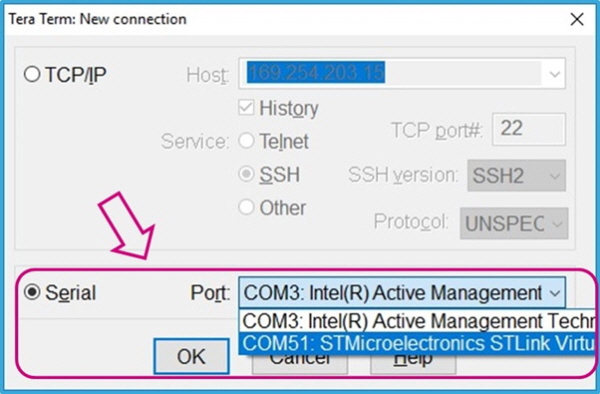
‘시리얼 포트’를 선택해, STM32 Nucleo에 해당하는 COM 포트를 선택한다. 그 후, OK를 클릭.
선택 Port : 「COM x: STMicroelectronics STLink Virtual COM Port」
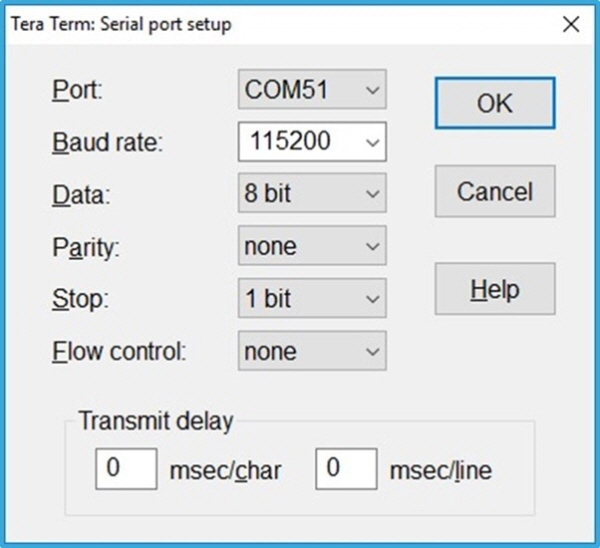
시리얼 포트를 다음과 같이 설정한다.
Baud rate=115200, Date=8bit, Parity=None, Stop bit=1
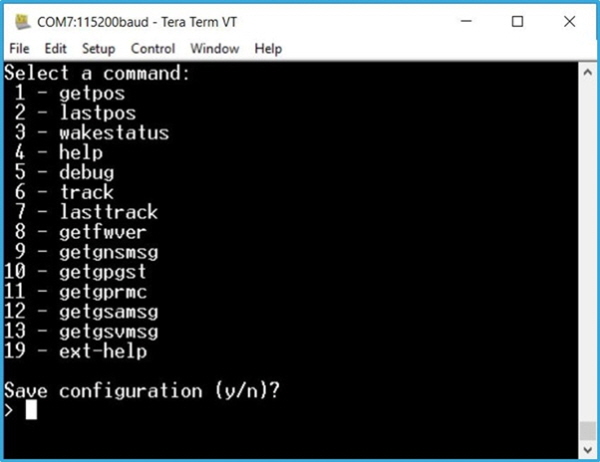
STM32 Nucleo 보드의 리셋 버튼(검은색 스위치)을 누르면, 다음과 같은 명령어 리스트가 표시된다.
(보충)마지막에 「Save configuration (y/n)」라고 표시되지만 무시한다.
※ 유용한 명령어 몇 가지
1)GETPOS : $GPGGA NMEA 메시지를 취득&디코드하여, 위치 정보를 출력한다.
4)HELP : 명령어 메뉴를 출력한다.
8)GETFWVER : ST의 독자적인 명령어 $PSTMGETSWVER를 발행하여, Teseo모듈 내 펌웨어의 버전을 출력한다.
11)GETGPRMC : $GPRMC 메시지를 취득&디코드한다. Recommended Minimum Specific GPS/Transit data.
12)GETGSAMSG : $--GSA 메시지를 취득&디코드하여, 정밀도 저하율(GNSS DOP) 및 액티브한 위성 정보를 출력한다.
13)GETGSVMSG : $--GSV 메시지를 취득&디코드하여, 보이는 위성의 정보를 출력한다. 위성 측위 시스템별로 출력된다.
○ GNSS 메시지 확인
명령어 번호를 입력하면, 원하는 데이터를 표시할 수 있다. 대표적인 메시지에 대해 몇 가지 표시 예를 소개하겠다.
>1-getpos:$GPGGA (essential fix data. Provide 3D location and accuracy data)
(터미널에서 "1" 입력)
NMEA $GPGGA 메시지에 해당한다. 기본적인 3D 위치 정보를 출력한다.
UTC : 협정 세계시(일본 시각=UTC+9시간)
Latitude : 위도
Longitude : 경도
Altitude : 고도
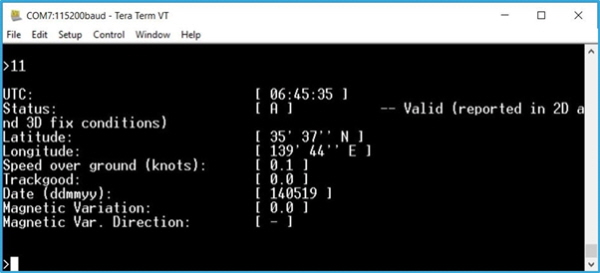
>11-getgprmc : $GPRMC (essential gps pvt (position, velocity, time) data. Recommended Minimum)
(터미널에서 "11" 입력)
NMEA $GPRMC 메시지에 해당한다. 기본적인 위치 정보(좌표, 시각, 속도)를 출력한다. ‘위도 경도 좌표만 알고 싶은’경우, 이 메세지가 효과적이다. 날짜 정보도 취득할 수 있다.
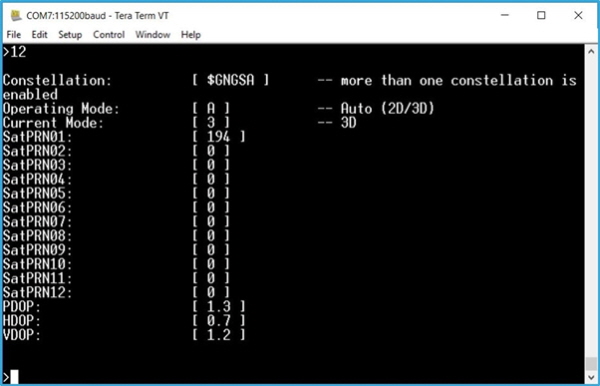
>12-getgsamsg : $GPGSA (GPS DOP and active satellites)
(터미널에서 "12" 입력)
NMEA $GPGSA 메시지에 해당한다. 액티브한 위성 정보를 출력한다. 정밀도 저하율 정보(DOP)도 포함되어 있다.
다음 GUI편에서는 GUI 툴을 사용하여, 보다 간단하게 조작하는 방법을 소개하겠다. 지도상에서 트래킹 할 수도 있다.