STM32 Nucleo 보드, 위저드 GNSS 설정
원하는 변경 각 단계 선택 진행 완료
위저드 이용변경 후, QZSS 신호 추가
[편집자주]일반적으로 반도체라 하면 컴퓨터의 CPU와 메모리처럼 일반인에게 익숙한 반도체를 떠올리기 마련이다. 반면에 전자제품 구동을 위해서 핵심 반도체로 쓰이는 MCU(Micro Controller Unit)의 경우 일반적으로 우리가 쉽게 접하는 모든 전자제품에서 사용되고 있으면서도 일반인에게는 아직 낯선 반도체다. 이런 MCU가 최근 반도체 부족 사태로 인해 언론에 오르내리며, 일반인들에게 주목받기 시작했다. 이에 본지는 MCU 반도체 전문기업인 ST마이크로일렉트로닉스의 유지 카와노 매니저의 연재기고를 통해 MCU에 대해 전문적으로 알아보는 자리를 마련했다.

STM32 Nucleo 보드를 사용한 GNSS(Global Navigation Satellite System, 세계 위성 항법 시스템) 평가 환경 사용법의 다음편이다.
GUI 툴(TESEO-SUITE)을 사용해, Teseo-LIV3F(GNSS 모듈) 설정을 변경하는 방법에 대해 설명하겠다.
변경 방법은 위저드를 사용하는 방법과 수동으로 직접 해당 비트를 조작하는 방법 등 2가지가 있는데, 이번에는 위저드를 사용하는 방법에 대해 소개하겠다.
■ TESEO-LIV3F 모듈 설정 변경하기/위저드편
○ 위저드를 오픈
위저드 형식이기 때문에 원하는 변경을 각 단계에서 선택하여 진행하면 완료된다.
마지막에 디바이스에 그대로 기록할 수도 있고, 설정 파일로 PC 내에 저장할 수도 있다. 먼저 Configuration wizards 아이콘을 클릭한다.
Wizard Selection 창이 열리는데, 여기서 디바이스가 접속돼 있으면, ‘COM x Device X’에 자동으로 선택되므로 확인한다.
여기서는 한 예로, 사용하는 콘스텔레이션(위성 시스템)을 변경해 보겠다. Constellations을 선택한 상태에서 Play Wizard를 클릭한다.
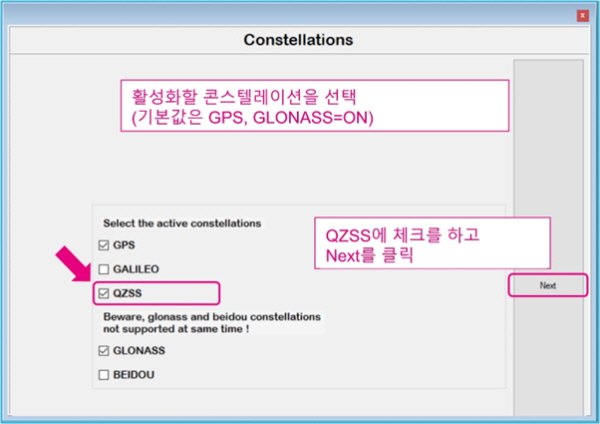
디폴트로 GPS(미국), GLONASS(러시아) 2개의 콘스텔레이션이 On으로 되어 있기 때문에 추가로 QZSS(일본)을 On으로 해 보겠다.
1. 활성화할 콘스텔레이션을 선택
‘QZSS’에 체크한 후, Next를 클릭한다.
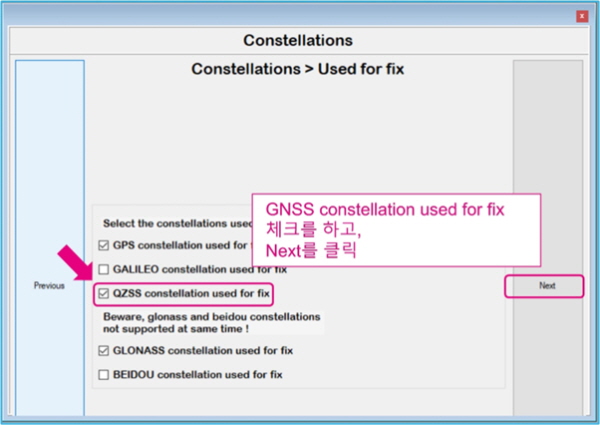
2. 위치 취득용으로 사용
그 다음, ‘QZSS constellation used for fix’에 체크한 후, Next를 클릭한다.
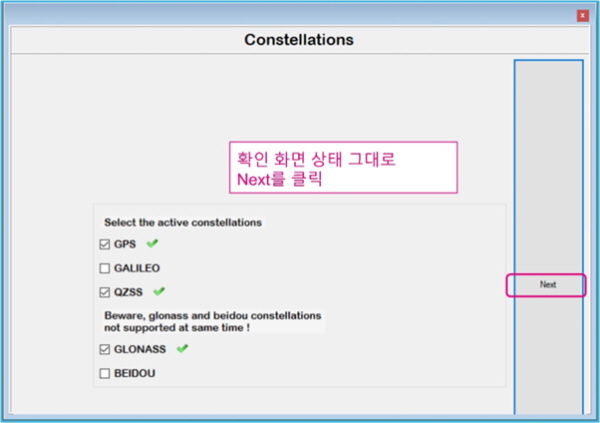
3. 확인 화면
그대로 Next를 클릭하여 다음으로 넘어간다.
4. 최종 리뷰
최종 설정 내용 리뷰. 이번에 QZSS를 On으로 했기 때문에 해당 항목 비트가 1(=ON)로 돼 있다. 문제가 없으면 OK를 클릭한다.
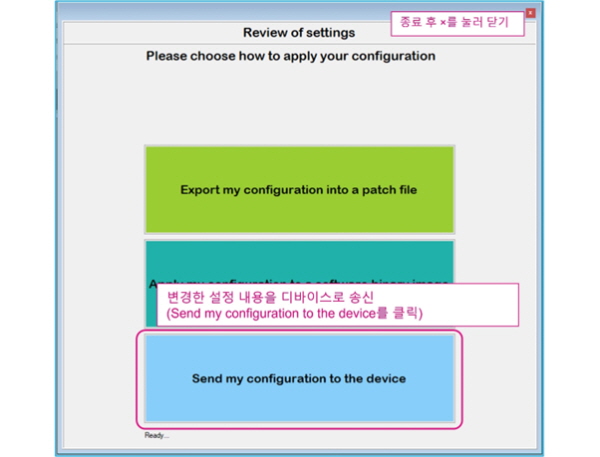
5. 디바이스로 설정 송신
변경한 내용을 디바이스에 반영시킬 경우, Send my configuration to the device를 클릭해, 모듈 내의 Flash 메모리에 저장한다.
또한 Export my configuration into a patch file을 클릭하면 상기의 설정 내용을 PC 내에 xml 파일로 저장할 수 있다.
읽기는 첫 번째 「Wizard Selection」→「My configuration」 탭에서 실시할 수 있다.
위저드를 이용한 설정은 이상으로 완료된다. 그럼, 확인해 보겠다.
■ 확인
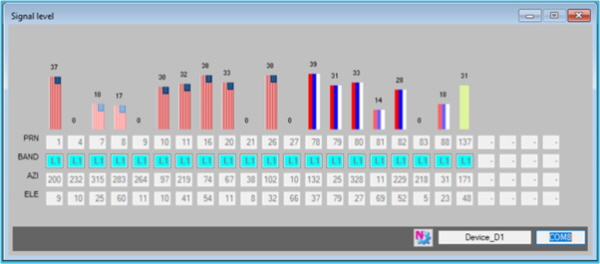
설정 변경 전에 위성 시그널을 수신한 예다. 디폴트 설정으로는 GPS와 GLONASS의 신호를 관찰할 수 있다.
상기의 위저드를 이용한 변경 후, QZSS 신호가 추가됐다.
아울러 다음편의 수동 설정 방법도 참조해 부탁한다.


.jpg)
.jpg)
.jpg)