Installing Raspberry Pi Raspbian ( Raspbian 2019-04-08 Version )

네오즈 · 2019-09-26 · 4
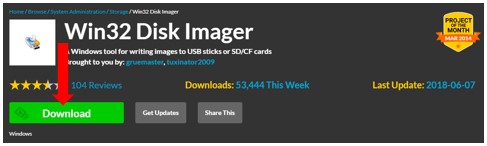
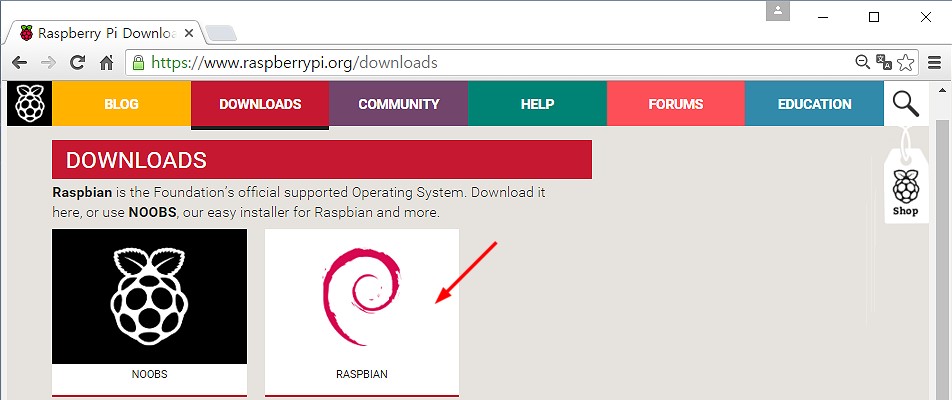
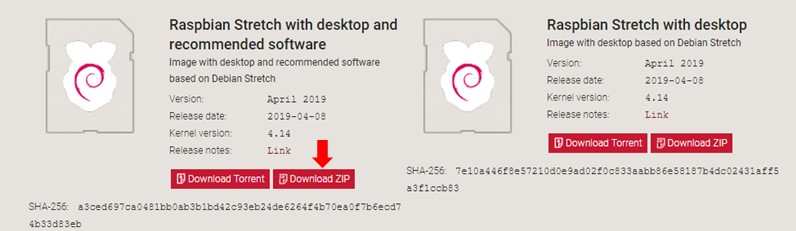
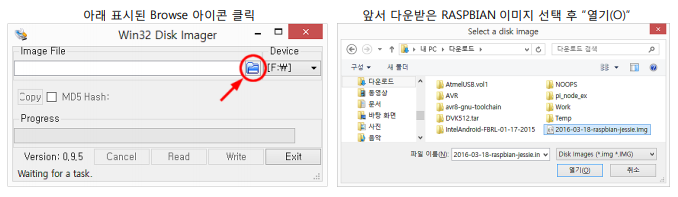
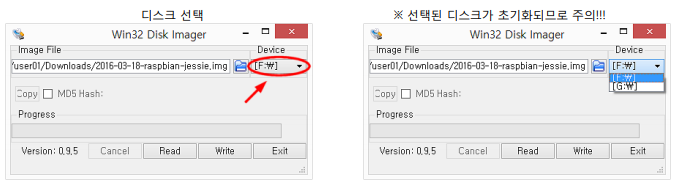
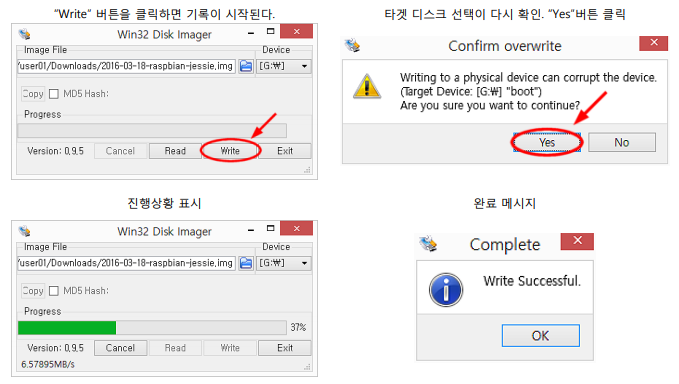
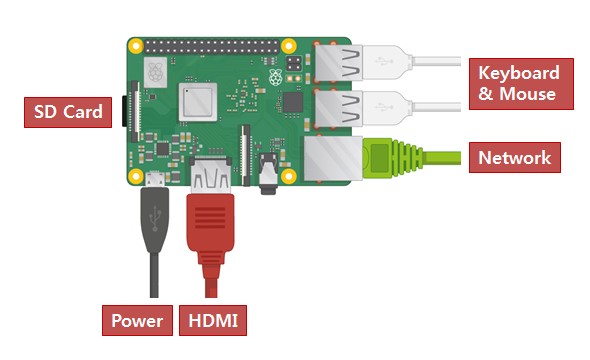
```json {"time":1717347273643,"blocks":[{"id":"YTHOG6GwbG","type":"headerAlign","data":{"text":"Creating a System Disk","level":2,"alignment":"left"}},{"id":"Bm_vjIR_1u","type":"paragraph","data":{"text":"RASPBIAN is a Debian-based Linux distribution. Since the file systems of Windows and Linux differ, a system disk for Raspberry Pi cannot be created in a Windows environment simply by copying necessary files to a micro SD card."}},{"id":"wtqSxoJ3UF","type":"paragraph","data":{"text":"1. Download and Install Win32DiskImager"}},{"id":"i6TzaqpeHK","type":"paragraph","data":{"text":"Win32DiskImager is a program that reads system disk images and writes them in Linux format to the target disk (the micro SD card to be used with Raspberry Pi)."}},{"id":"T9Sl_cRuWq","type":"paragraph","data":{"text":"Open the address http://sourceforge.net/projects/win32diskimager/ in a web browser and click the Download button indicated below."}},{"id":"L5lVWDWPaw","type":"simpleImage","data":{"url":"http://192.168.10.9:3000/img_e4dsmake/ck/N8SPVLTDSDCK88B7WIWK.jpg","caption":"","withBorder":false,"withBackground":false,"stretched":false}},{"id":"ntL61f-HqT","type":"paragraph","data":{"text":"Execute the downloaded win32diskimager-1.0.0-install.exe file to install the Win32DiskImager program."}},{"id":"K0-tCYhluR","type":"paragraph","data":{"text":"2. Download RASPBIAN"}},{"id":"ULIE642VCI","type":"paragraph","data":{"text":"Open the address http://raspberrypi.org/downloads in a web browser and click the download link indicated below."}},{"id":"Ba5EcXDVIA","type":"simpleImage","data":{"url":"http://192.168.10.9:3000/img_e4dsmake/ck/TUM5JHNOO9UJTVE6AHO8.jpg","caption":"","withBorder":false,"withBackground":false,"stretched":false}},{"id":"3I8dPA3fnZ","type":"paragraph","data":{"text":"Click the \"Download ZIP\" button indicated below to download RASPBIAN, the official system image from the Raspberry Pi Foundation."}},{"id":"8-9_gttXho","type":"simpleImage","data":{"url":"http://192.168.10.9:3000/img_e4dsmake/ck/LNY1EHTI340X4JK1OCQV.jpg","caption":"","withBorder":false,"withBackground":false,"stretched":false}},{"id":"z8uSKdKsaj","type":"paragraph","data":{"text":"Extract the downloaded zip file and remember (or make a note of) the location of the resulting img file."}},{"id":"HrPQURqfZe","type":"paragraph","data":{"text":"? RASPBIAN STRETCH WITH DESKTOP : Version that includes GUI environment (X-Windows)"}},{"id":"8Ue2LLvlOF","type":"paragraph","data":{"text":"? RASPBIAN STRETCH LITE : Version that excludes GUI environment (X-Windows)"}},{"id":"fUtbdcNhCh","type":"paragraph","data":{"text":"3. Creating the System Disk"}},{"id":"2ac0xWBoID","type":"paragraph","data":{"text":"Now the necessary image file and image writing program are ready."}},{"id":"bGHVcVrc71","type":"list","data":{"style":"ordered","items":["Insert an 8GB or larger micro SD card to be used with Raspberry Pi into a card reader and connect it to the PC","Execute Win32DiskImager (Start → Programs → Image Writer → Win32DiskImager)"]}},{"id":"pD1UrgLVos","type":"simpleImage","data":{"url":"http://192.168.10.9:3000/img_e4dsmake/ck/NKUDF80MM60EAD0WECHM.png","caption":"","withBorder":false,"withBackground":false,"stretched":false}},{"id":"fxWtVbKrW1","type":"simpleImage","data":{"url":"http://192.168.10.9:3000/img_e4dsmake/ck/4C0FNJB1FDE9KZXYV2SA.png","caption":"","withBorder":false,"withBackground":false,"stretched":false}},{"id":"CUX_dB9pY6","type":"paragraph","data":{"text":"If two or more disks are displayed in Device, be careful as all contents of the selected disk will be erased. (You may accidentally lose important data such as public certificates.)"}},{"id":"vuzht9rPJ7","type":"simpleImage","data":{"url":"http://192.168.10.9:3000/img_e4dsmake/ck/DIKFHG4SJ0LEZ5Z02IKN.png","caption":"","withBorder":false,"withBackground":false,"stretched":false}},{"id":"MoeEY2eVuE","type":"paragraph","data":{"text":"The system disk has been created. Now you are ready to use Raspberry Pi. As shown in the figure below, insert the created system disk into the Raspberry Pi and connect the monitor, keyboard, mouse, and Ethernet, then connect the power."}},{"id":"UilJoCiwFa","type":"simpleImage","data":{"url":"http://192.168.10.9:3000/img_e4dsmake/ck/N5EQ6KBSVZWQ2LOZZ6A9.jpg","caption":"","withBorder":false,"withBackground":false,"stretched":false}}],"version":"2.30.5"} ```
4
댓글 0
등록된 댓글이 없습니다.