

[로봇팔 제어 프로젝트 1] 시리얼통신을 이용한 서브모터 제어
본 실습을 통해 서보모터의 기초를 연습한 후 최종적으로 로봇팔 제어 프로젝트까지 연결할 수 있다.
준비물 : Arduino, 서보모터 2개 내용 : Arduino Uno를 이용하여 서보모터 2개를 제어한다. 전원을 연결하게 되면 서브 모터 2개는 90도에 맞춰 움직인 후 입력을 기다리는 상태가 된다. 동작은 다음과 같다. 1. W 입력 => 서보모터 1 앞으로 30도 회전 2. S 입력 => 서보모터 1 뒤로 30도 회전 3. A 입력 => 서보모터 2 왼쪽으로 30도 회전 4. D 입력 => 서보모터 2 오른쪽으로 30도 회전
☞서보모터의 경우 회전이 0~180도까지 가능하기 때문에 코딩상에 회전을 0~180도까지 제한해야 한다.
회로 연결은 다음과 같다.
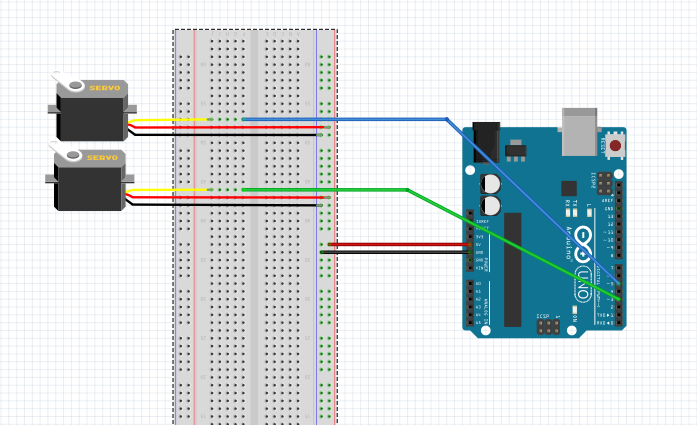
아두이노의 5V와 Ground를 브래드 보드에 연결하여 공통 전원을 구성한 후 서브모터 2개의 VCC, GND를 연결하였다. 서보모터에 사용되는 입출력 핀은 3, 5번을 연결하여 회로를 구성하였다. (서보모터는 PWM으로 제어하기 때문에 3,5,6,9,10,11번 핀을 사용하면 됨)
코딩은 다음과 같다. (주석 포함)
#include <Servo.h> //헤더파일 포함

Servo servo1; //servo1 변수 선언
Servo servo2; //servo2 변수 선언

int motor1 = 3; //motor1을 입출력 3번 핀에 연결
int motor2 = 5; //motor2을 입출력 5번 핀에 연결
int angle1 = 90; //초기 각도값 설정
int angle2 = 90; //초기 각도값 설정

void setup() {
  servo1.attach(motor1); //servo1에 입출력 3번 핀을 지정
  servo2.attach(motor2); //servo2에 입출력 5번 핀을 지정
  Serial.begin(9600); //시리얼 모니터 사용
  Serial.println("Enter the w,a,s,d ");
}
void loop() {
  if(Serial.available()) //시리얼 통신이 가능할 경우
  {
    char input = Serial.read(); //시리얼 모니터 입력 값을 읽어옴
    if(input =='w') //입력값이 W일 경우
    {
      Serial.print("+30");
      for(int i = 0; i <30; i++) // 30번 반복
      {
        angle1 = angle1 + 1; // angle1의 값에 1씩 30번을 더함
        if(angle1 >=180) // angle1이 180보다 커지거나 같아질 경우
        angle1 = 180; // angle1을 180으로 고정
        servo1.write(angle1); // servo1을 angle1 값에 맞추어 동작
        delay(10);
      }
      Serial.print("\t\t");
      Serial.println(angle1);
    }
    else if(input =='a') //입력값이 a일 경우
    {
      Serial.print("+30");
      for(int j = 0; j <30; j++)
      {
        angle2 = angle2 + 1;
        if(angle2 >=180)
         angle2 = 180;
        servo2.write(angle2);
        delay(10);
      }
      Serial.print("\t\t");
      Serial.println(angle2);
    }
     else if(input == 's') //입력값이 s일 경우
     {
      Serial.print("\t-30\t");
      for(int i = 0; i <30; i++) // 30번 반복
      {
        angle1 = angle1 -1; // angle1의 값에 1씩 30번을 빼기
        if(angle1 <= 0) // angle1이 0보다 작아지거나 같을 경우
        angle1 = 0; // angle1을 0으로 고정
        servo1.write(angle1); // servo1을 angle 값에 맞추어 동작
        delay(10);
      }
      Serial.println(angle1);
     }
     else if(input == 'd')  //입력값이 d일 경우
     {
      Serial.print("\t-30\t");
      for(int j = 0; j <30; j++)
      {
        angle2 = angle2 -1;
        if(angle2 <= 0)
        angle2 = 0;
        servo2.write(angle2);
        delay(10);
      }
      Serial.println(angle2);
     }
  }
}
시리얼 모니터를 통해 서보모터의 각도를 수치로 확인할 수 있다. 앞으로 모든 실습활동에서 시리얼 모니터를 통해 각도, 입력 값, 데이터 등을 확인할 것이기 때문에 시리얼모니터를 잘 활용하기를 바란다.
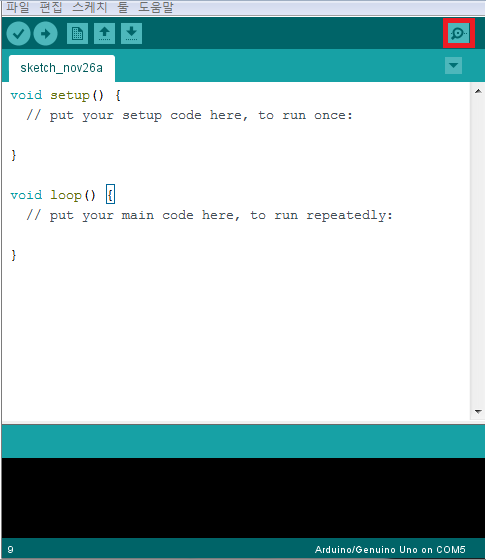
위에 빨간색 네모칸에 있는 돋보기 형태의 버튼을 누르게 되면 시리얼 모니터 창의 열리게 된다. 다른 방법으로는 상단의 툴 버튼을 눌러 시리얼 모니터를 클릭하면 시리얼 모니터가 열리게 된다.
시리얼 모니터 결과는 다음과 같다.
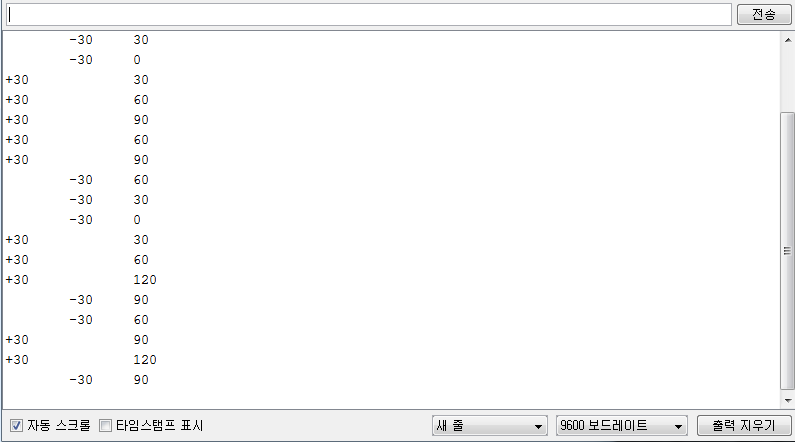
시리얼 모니터 입력창에 w, a, s, d를 입력하게 되면 입력한 값에 맞게 각도를 계산하여 현재의 서보모터 각도를 계산하여 출력한다.
동작영상