

[STM32 MCU 제어 가이드] 버튼 입력 – LED 출력 동작 제어
주피터 · 2019-11-25 · 7,140
STM32F7 제품군은 STMicroelectronics사에서 제공하는 32비트 마이크로 컨트롤러 유닛입니다. ARM® Cortex®-M 프로세서를 기반으로 하는 초고성능 MCU이며 실시간 제어 기능을 보유하고 있습니다. 이번에 사용하게 될 STM32F746 Discovery Kit는 주로 프로토 타이핑, 독창적인 데모 제품을 만드는데 최적화 되어있습니다.
제어 가이드의 첫 시작으로서, 가장 기본적인 I/O 기능을 사용해보며 MCU의 기본 동작 원리에 대해 직접 실습으로 확인해봅니다.
1. 동작 원리
버튼을 누르면 LED가 ON되고, 누르지 않으면 LED가 OFF된다.
2. 준비물
| 타입 | 제품명 | 구매처 및 설치 |
| 하드웨어 | STM32F746 Discovery Kit | https://kr.mouser.com/ProductDetail/STMicroelectronics/STM32F746G-DISCO?qs=sGAEpiMZZMsMyYRRhGMFNlt5IaEdZrcOkzygY9sKdC8%3d |
| 소프트웨어 | Atollic TrueSTUDIO | https://atollic.com/resources/download/ |
3. 가이드
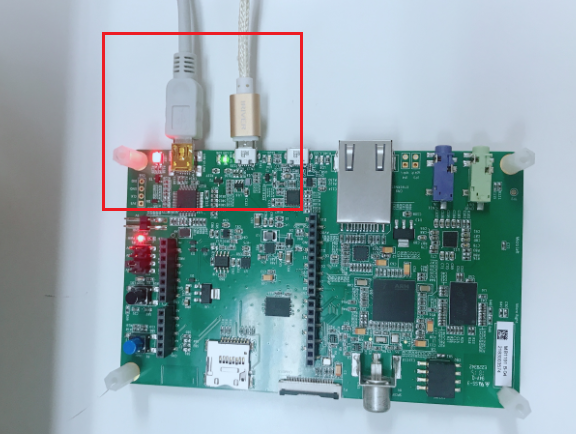
(1) 다음과 같이 컴퓨터의 USB포트와 보드를 연결한다.
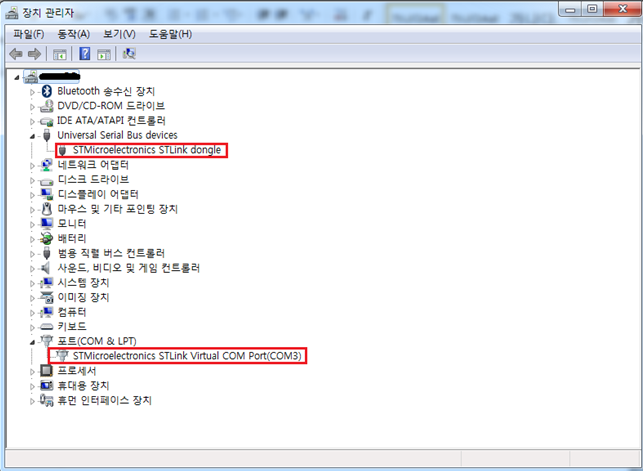
(2) 윈도우 탭 -> ‘장치 관리자’ 검색 -> STM32 MCU가 정상적으로 연결되었는지 확인한다.
만약, 연결이 되지 않는다면 STM32 Virtual Port 드라이버를 설치한다
* Virtual Port 설치
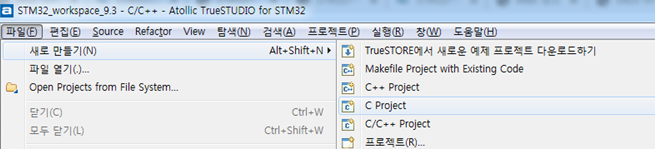
(3) 개발 환경을 만들기 위해 TrueSTUDIO에서 STM32F746에 최적화된 C프로젝트를 생성해야 한다.
메뉴에서 파일 -> 새로 만들기 -> C Project를 선택한다.
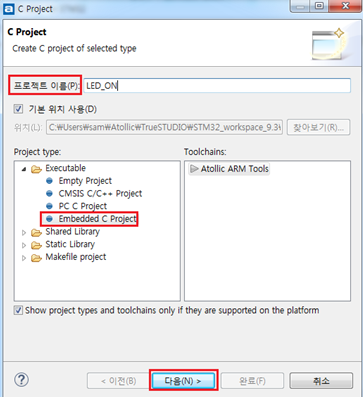
(4) 프로젝트 이름 입력 -> Embedded C Project를 선택한다.
(5) ‘타겟’에 STM32F746 검색 -> STM32F746NG선택
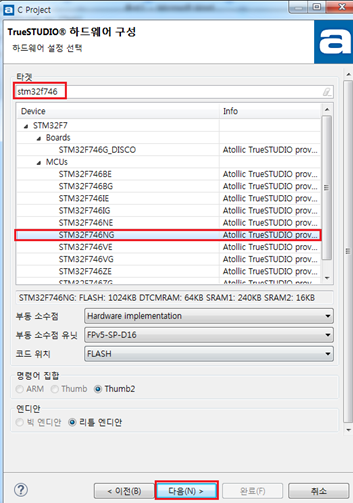
(6) 디버그 프로브를 ST-LINK로 선택
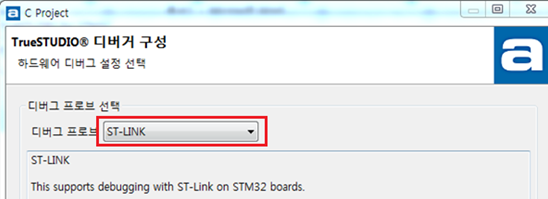
※ 위의 과정에서 생략된 화면들은 별도의 설정 없이 '다음'버튼을 누르면 된다.
이로써 기본 설정은 완료 되었으니 아래와 같이 코드를 작성한다. 각 코드에 대한 설명은 오른쪽 주석을 확인한다.
(7) 왼쪽의 프로젝트 탐색기에서 main.c를 더블 클릭 -> int main(void) 아래로 다음과 같이 입력 -> 디버그를 실행한다.
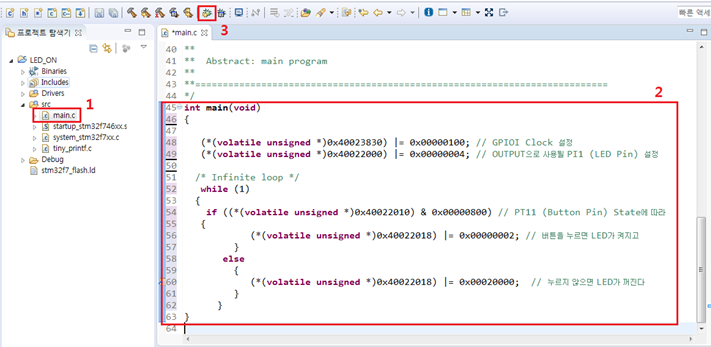
※ 보드의 핀 설정에 대해서는 추후에 집중해서 다룰 예정이다.
(8) 디버그를 실행하면 다음과 같은 화면이 뜬다. 에러가 없다면 디버그 중지 버튼을 누르고, 코드가 보드에 빌드된다.
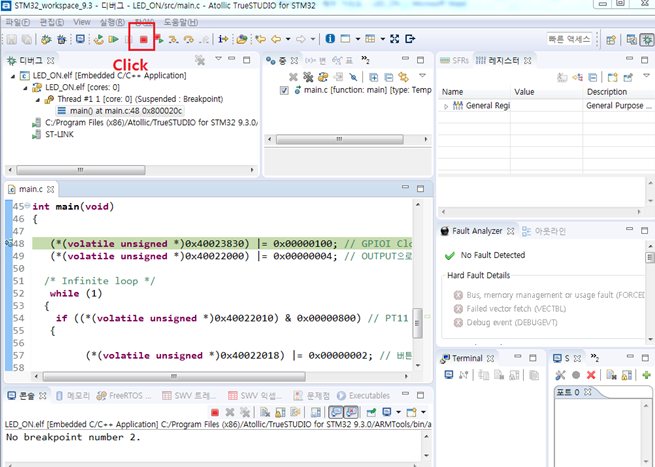
(9) 정상적으로 빌드 되었다면 아래 동영상과 같이 동작한다. 만약 빌드 에러가 발생한다면 오타가 있는지,
혹은 세미콜론이 빠졌는지 확인한다.
* 첨부한 소스 파일은 압축 해제 후 .cproject 파일을 Atollic TrueStudio로 열어서 확인이 가능하다.
7,140
댓글 0개
등록된 댓글이 없습니다.