

라즈베리파이 raspi-config를 이용한 시스템 기본 설정
시스템 기본 설정
pi계정의 패스워드를 변경하거나, 라즈베리파이의 호스트네임을 변경하려면 ‘passwd’ 명령을 사용하거나, “/etc/hosts” 파일과 “/etc/hostname”을 편집하여야 하는데, 익숙하지 않은 사용자에게는 매우 불편한 방법이다. 라즈베리파이는 이러한 시스템 설정 변경을 편리하게 할 수 있도록 “raspi-config” 라는 프로그램을 제공한다. 이를 이용하여, 라즈베리파이를 사용하기 위한 기본적인 시스템 설정을 해보자.
아래 표시한 터미널 아이콘을 클릭하여 터미널을 실행한다.

터미널에서 아래와 같이 입력한다.
| pi@raspberryPi:~ $ sudo raspi-config |
아래 그림에서 보여지듯이 9개의 메인 메뉴가 나타난다. 메뉴간의 이동은 방향키, 탭 키를 선택은 스페이스 바, 엔터 키를 이용한다.
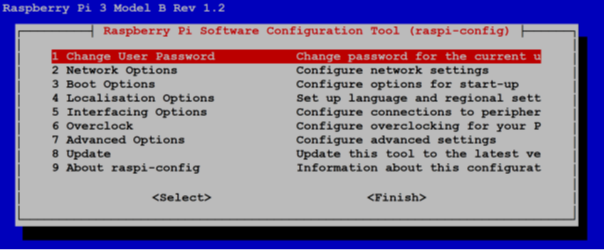
각 메뉴의 기능은 다음과 같다.
1. Change user password
라즈베리파이 기본사용자 “pi”의 패스워드를 변경해 주는 메뉴로, 콘솔 창에서 password 명령으로 변경해야 하는 작업을 명령어 입력 없이 가능하게 해준다.
아래와 같이 새로운 패스워드를 입력을 요구하는데, 이 때 새 패스워드 입력 시 화면상에 어떤 변화도 나타나지 않지만 제대로 입력되고 있는 것이므로 당황하지 말자. ( 입력 글자 수 대로 **** 처럼 화면에 표시되지 않는다. )
| Enter new UNIX password : Retype new UNIX password : |
“Password changed successfuly” 메세지가 화면에 나타나면 패스워드가 변경된 것이다.
2. Network Option
네트워크관련 설정 중 hostname 변경, WiFi 연결, 네트워크 인터페이스 이름 부여방식 변경 방법을 제공한다.
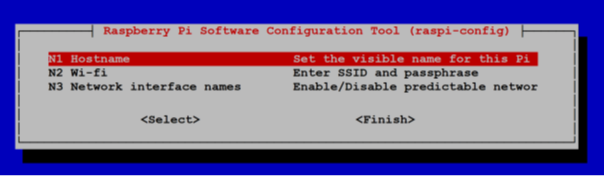
N1. HostnameWait for Network at Boot
hostname을 변경할 수 있다. ( “/etc/hostname” 파일과 “/etc/hosts” 파일의 내용을 바꿔준다. 터미널 실행 시 표시되는 프롬프트 ”pi@raspberrypi : ~”의 컴퓨터 이름에 해당하는 “raspberrypi” 를 변경. )
N2. Wi-Fi
사용하려는 무선 AP( Access Pointer )의 SSID 와 Password( passphrase )를 입력 받아 Wi-Fi 연결을 설정해 준다. )
N3. Network interfaces names
리눅스에서 그 동안 사용해 오던 전통적인 네트워크 인터페이스 이름( eth0, eth1, …, wlan0, wlan1, … )과 같이 예측 가능한 네트워크 인터페이스 명 대신, 예측하기 어려운 인터페이스 이름 사용 설정
3. Boot option
라즈베리파이의 시스템 시작 시 실행 옵션을 정해준다. 아래 4가지 옵션 중 하나를 선택한다.
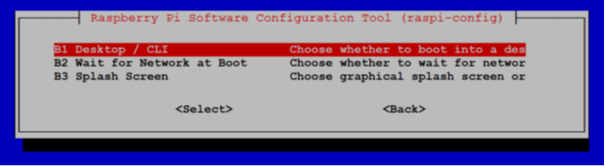
B1. Desktop / CLI
시작 시 GUI( Graphic User Interface : X-Windows )로 시작할 것인 지, CLI( Command Line Interface : 명령 프롬프트 환경 )으로 시작할 것인지를 선택할 수 있다. 아래 4가지 중 하나를 선택한다.
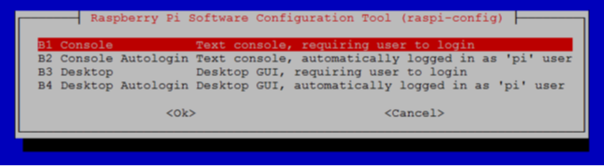
B1. Console \--\--\--\--\--\--\--\--\--\-- Text Console 시작 ( ID, Password 입력 필요 )
B2. Console, Autologin \--\--\--\-- Text Console 시작, 자동 로그인( ID, Password 입력 불필요 )
B3. Desktop GUI \--\--\--\--\--\--\--- Desktop GUI 시작 ( ID, Password 입력 필요 )
B4. Desktop GUI, Autologin \--- Desktop GUI 시작, 자동 로그인 ( ID, Password 입력 불필요 )
( 기본 설정은 “B4. Desktop GUI, Autologin”, Desktop GUI는 리눅스의 X-Windows 환경을 말한다. )
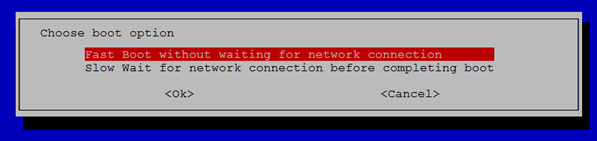
B2. Wait for Network at Boot
부팅 시 네트워크 연결상태 확인 과정 없이( Fast ) 진행할 것인지, 확인 후( Slow ) 진행할 것인지를 선택.
B3. Splash Screen
부팅 시 화면에 디스플레이되는 PIXEL Logo그림을 표시 할 것인지를 선택한다.

4. Localisation option
지역, 국가 등에 관련된 설정으로 로케일( Locale ), 표준시, 키보드 레이아웃을 설정
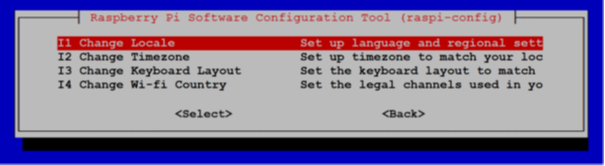
I1. Change Locale
윈도우의 제어판 항목 중, “국가 또는 지역”에 해당한다. 날짜, 시간, 통화단위 등의 표시 등을 설정된 Locale의 형식을 따르게 된다. 기본 값으로 설정된 “영국”을 “대한민국”으로 변경해준다.
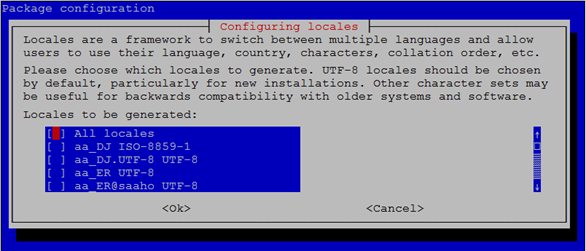
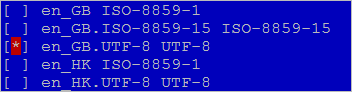
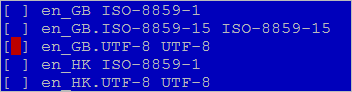
위, 아래 방향키를 이용하여 현재 설정되어 있는 로케일( en_GB.UTF-8 )로 이동, 스페이스 바를 이용해 해제하고, 미국( en_US.UTF-8 ), 대한민국( ko_KR.UTF-8 ) 로케일을 추가한다.
.png)
.png)
.png)
.png)
위 그림에서 보여지듯이 같은 로케일이 en_GB와 en_US의 경우는 3가지, ko_KR의 경우는 2가지가 있지만, 반듯이 그 중UTF-8을 선택해야 한다. 추가한 Locale을 설치 후, “Default locale for system” 설정은 en_US로 설정한다. ( 한글 폰트 설치 전 바른 화면 표시를 위해 )
I2. Change Timezone
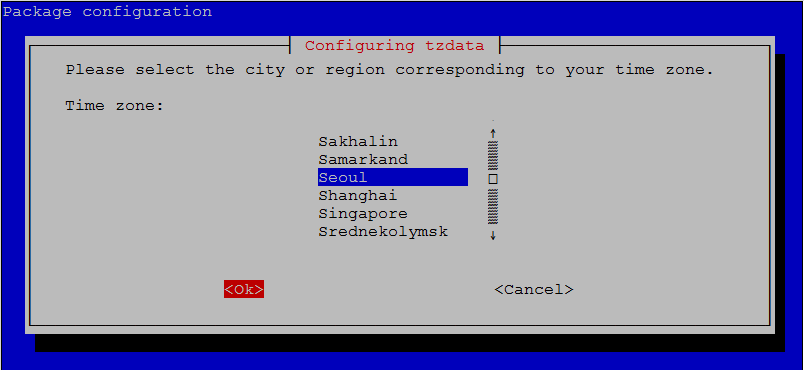
표준시각을 설정한다. Asia ? Seoul로 설정.
.png)
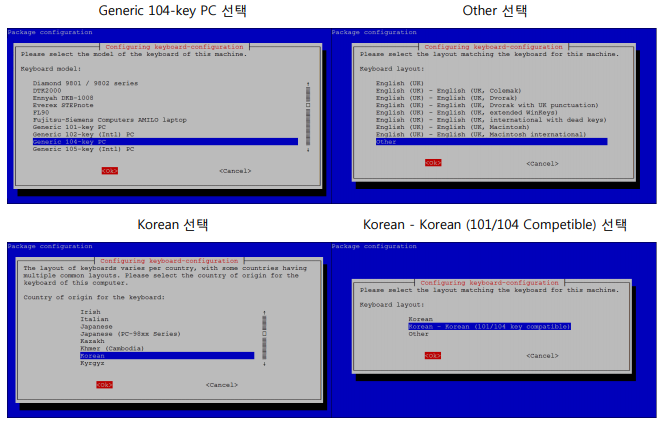
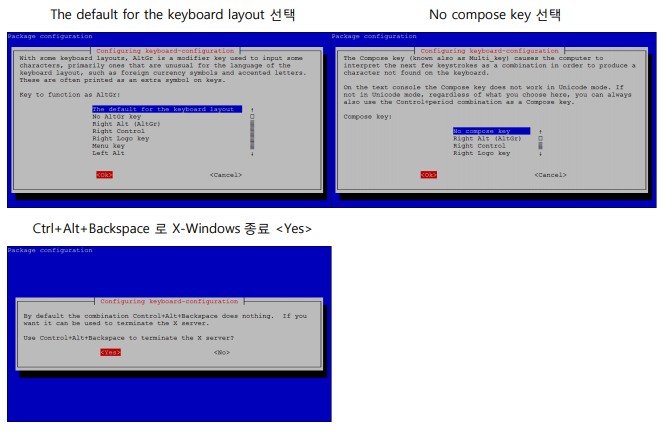
I3. Change Keyboard Layout ( * 라즈베리파이 3 B+는 Skip : 한글입력이 안될 수 있음 )
기본설정이 UK(영국)로 설정되어 있어서, 변경하지 않을 경우 “#”을 입력할 때 “£”( 영국 통화단위 파운드 기호 )가 입력된다
I4. Change Wi-fi country
기본설정이 GB(영국)로 설정되어 있지만, 굳이 KR로 변경하지 않는다. 변경할 경우, GUI 환경에서 Wifi 설정을 할 경우, 그 설정이 제대로 적용되지 않는 버그가 있다.
5. Interfaceing option
라즈베리파이와 주변장치의 연결에 대한 옵션들을 설정
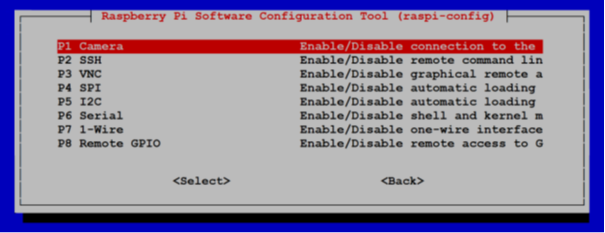
P1. Camera
라즈베리파이의 카메라 연결 포트를 활성화 여부를 선택한다. ( 파이 카메라 사용 시 Enable 선택 )
P2. SSH
Secure Shell Server Demon( 보안이 강화된 원격 접속 서버 )의 활성 여부를 설정한다. 기본값으로 이미 설정되어 있다. 특별한 이유가 없다면 그대로 사용한다. ( 매우 유용한 기능이다. )
P3. VNC
GUI 원격 접속을 위한 VNC( Virtual Network Computing ) 서버 데몬 활성화 여부 선택. Real VNC 클라이언트 프로그램을 이용한 GUI원격접속을 위해서 선택해 두자.
P4. SPI
라즈베리파이 BCM GPIO 07, 08, 09, 10, 11을 각각 SPI 통신포트의 CE1, CE0, MISO, MOSI, SCLK의 기능으로 사용하도록 설정.
P5. I2C
라즈베리파이 BCM GPIO 00, 01, 02, 03을 각각 I2C 통신포트의 SDA0, SCL0, SDA1, SCL1의 기능으로 사용하도록 설정.
P6. Serial
라즈베리파이 1, 2 버전에서 /dev/ttyAMA0 시리얼 포트를 Serial Console로 사용할 것인지를 설정한다. 를 선택할 경우 모니터, 키보드 연결 없이 시리얼통신 연결을 통해 라즈베리파이의 상태 모니터링과 설정 변경 등이 가능하다. /dev/ttyAMA0 포트를 다른 장치와의 통신에 사용하려면 이 설정에서 를 선택해야 한다.
라즈베리파이3의 경우에는 시리얼콘솔을 사용할 경우, /boot/config.txt 내용의 마지막에 아래 내용을 추가하여 리부팅 한다. ( 이 경우, 블루투스가 비활성화 된다. )
| # add bellow for using serial console with /dev/ttyAMA0enable_uart=1dtoverlay=pi3-miniuart-bt |
P7. 1-Wire
1-Wire통신 인터페이스 사용 여부를 선택한다.
P8. Remote GPIO
네트워크를 통해 GPIO를 제어할 수 있도록 하는 서버 사용 여부를 선택한다.
6. Overclock
라즈베리파이3이전 버전의 라즈베리파이에서는 사용하는 클럭주파수를 기준 주파수 보다 높게 설정할 수 있는 메뉴를 제공하지만, 1.2GHz로 동작하는 라즈베리파이 3의 경우는 더 이상 높은 주파수를 설정할 수 없다.

7. Advanced Option
SSH서버 데몬 구동, 시리얼 콘솔 사용여부, GPIO의 I2C, SPI 포트 활성화 여부 등을 설정한다.
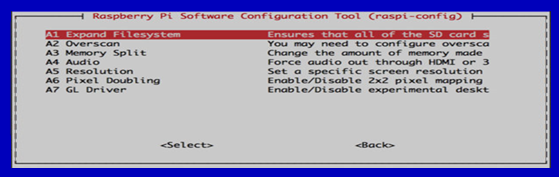
A1. Expand Filesystem
RASPBIAN 시스템 이미지는 최소 4GB의 Micro SD 카드에서 실행되도록 작성( 최근 배포된 RASPBIAN이미지의 크기 3.75GB )되어 배포된다. 이 이미지를 Micro SD 카드에 기록할 경우, 4GB의 경우 0.25GB, 8GB의 경우 4.25GB, 16GB의 경우 12.25GB의 할당되지 않은 디스크 공간이 발생한다. Expand Filesystem 메뉴는 파일시스템을 확장하여 할당되지 않은 디스크 공간을 사용할 수 있도록 해준다.
A2. Overscan
구형 CRT 모니터 연결 시 화면 표시 이상 개선( LCD 모니터 사용 시에는 설정할 필요 없다. ).
A3. Memory Spilt
기본메모리 중 비디오 메모리로 할당할 용량을 설정한다. ( CLI: 128 MB / GUI: 256MB정도가 적당하다. )
A4. Audio
Audio 출력방향을 HDMI와 3.5Φ Audio Jack 중 하나로 설정. ( 0. 자동선택 / 1. 3.5Φ Audio Jack / 2. HDMI )
A5. Resolution
모니터 없이 부팅 했을 경우 HDMI/DVI 비디오 해상도 설정 ( VNC 사용시 영향이 있음 )
A6. Pixel Doubling
고해상도 모니터로 데스크 탑 환경을 보고 싶을 때 설정
A7. GL Driver
라즈베리파이2, 3에서 X-Windows 사용 시, OpenGL 라이브러리를 통한 하드웨어 그래픽 가속기능 사용 여부 설정
8. Update
리눅스 시스템에서 어플리케이션을 추가 할 경우, 네트워크의 해당 어플리케이션이 저장되어있는 Repository 라는 곳에서 가져다 설치한다. 따라서 시스템 안에 설치 가능한 모든 어플리케이션의 Repository 주소가 기록되어 있는 목록( /etc/apt/sources.list )을 가지고 있다. 어플리케이션의 Repository가 변경되었을 경우 이 목록을 새 정보로 갱신하는 작업이 바로 업데이트이다.( sudo apt-get install update )
9. About raspi-config
설정 메뉴가는 아니다. raspi-config프로그램을 만든 의도, 설명이 간단히 언급되어 있다.