
마이크로칩 8월
This page was machine-translated and may differ from the original. View original

[Serial] ST Yuji Kawano Engineer (24) - Trying voice communication with Bluetooth® LE! Two-way call edition

Google 우선 소스Published2023.01.10 11:25
Very convenient Bluetooth LE call with one STM32WB

Transmit after compressing mono 16㎑ WAV, and play back transmitted on the receiving side
Using STM32 X-Nucleo board with MEMS microphone
[Editor's Note] Generally, when we talk about semiconductors, we tend to think of semiconductors that are familiar to the general public, such as the CPU and memory of computers. On the other hand, MCUs (Micro Controller Units), which are used as core semiconductors for operating electronic products, are semiconductors that are still unfamiliar to the general public, even though they are commonly used in all electronic products that we easily come across. These MCUs have recently been featured in the media due to the semiconductor shortage, and have begun to attract the attention of the general public. Accordingly, this magazine has prepared a place to learn about MCUs through a series of articles by Yuji Kawano, manager at STMicroelectronics, a company specializing in MCU semiconductors.
■ Two-way call demonstration using STM32WB series development board
This time, we will demonstrate two-way voice communication (calling) using Bluetooth® Low Energy (Bluetooth LE) using a development board for the STM32WB series of wireless microcontrollers from STMicroelectronics.
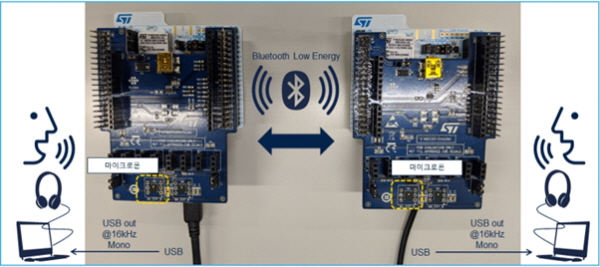
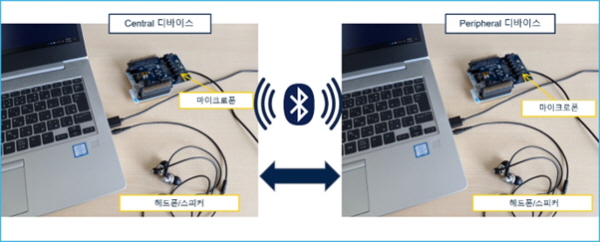
In this demonstration, we successfully achieved simultaneous calls using two sets of STM32 X-Nucleo expansion boards featuring digital MEMS microphones. It is very convenient because it can be done with just one STM32WB.
After compressing mono 16KHz sampling WAV data, it is transmitted via Bluetooth LE and played while transmitting the data on the receiving side.

■ Hardware Preparation
[Required Materials]
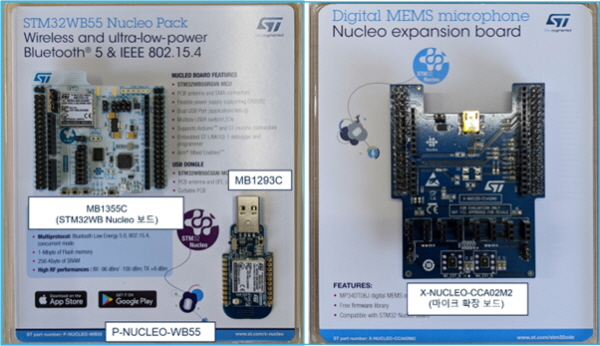
- STM32WB Nucleo pack (uses only the MB1355C board included in the pack) x 2 sets
- X-NUCLEO-CCA02M2 (MEMS Microphone Expansion Board) x 2 sets
- PC (Windows 10/7) x 2
- Micro-USB cable x 2

The board to be used this time is the MB1355C board mounted on the STM32WB55 Nucleo Pack (hereinafter referred to as the STM32WB Nucleo board) and the STM32 X-Nucleo microphone expansion board with a microphone, 'X-NUCLEO-CCA02M2' (hereinafter referred to as the MEMS microphone expansion board).
Prepare two sets as they are used for two-way calls. In addition to the board, prepare two PCs with speaker or headphone output for voice confirmation and two USB cables (Micro-USB).
■ Software Preparation
○ Install STM32CubeProgrammer (skip if installation is already complete)
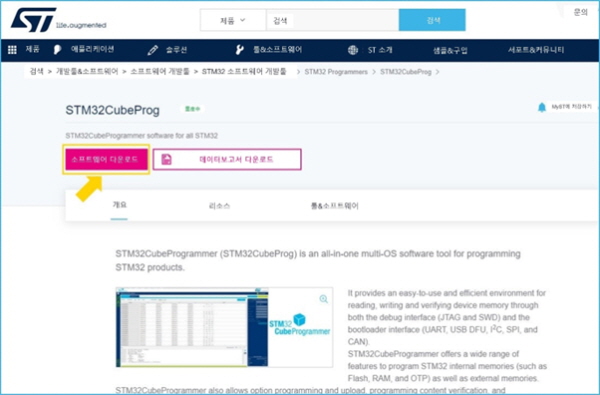
If this is your first time using the STM32 Nucleo board on your PC, install STM32CubeProgrammer (formerly ST Link Utility) to prepare the COM port driver, etc. (STM32CubeProgrammer is not used in this post, but the driver is required).
This tool is required to download software to STM32WB microcontrollers.
Go to the installation file: STM32CubeProgrammer

After unzipping the file, open the executable file and follow the instructions to install. If you have already installed STM32CubeProgrammer, you do not need to do this.
Once the installation is complete, proceed to the next step.
○ Preparing software for operation verification
▶Download the demo program file
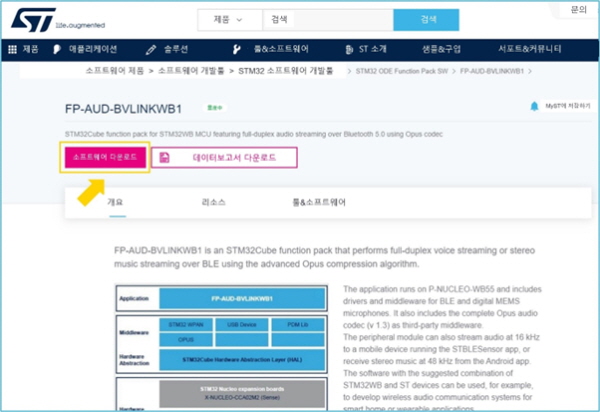
Next, download the demo program file.
Go to download: FP-AUD-BVLINKWB1 (skip if you have already completed the download)

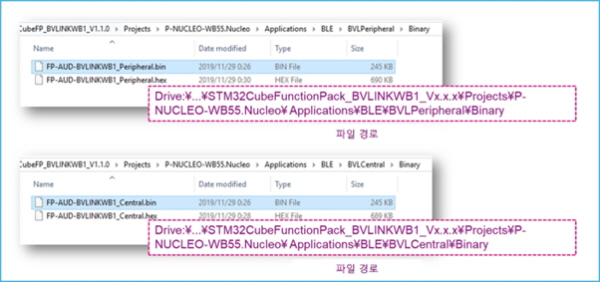
When you unpack the downloaded file, a working folder for your integrated development environment is created right away. There are two types of demo program files (binary files) to be used this time, one for Central and one for Peripheral, prepared in the folder below. Check the location of each file.
There is no hardware difference, so it doesn't matter which one you use (just don't download the same program files to both boards).
Save path (example):
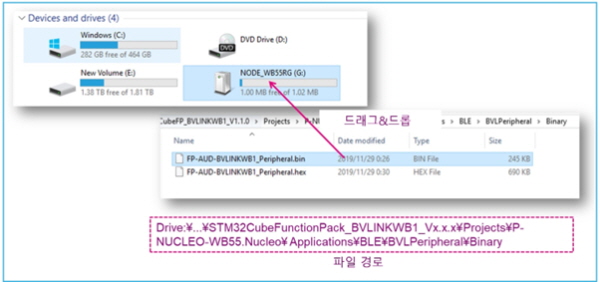
" 'Drive:....\STM32CubeFP_BVLINKWB1_Vx.xx\Projects\P-NUCLEO-WB55.NucleoApplications\BLE\BVLCentral\Binary'
" 'Drive:....\STM32CubeFP_BVLINKWB1_Vx.xx\Projects\P-NUCLEO-WB55.NucleoApplications\BLE\BVLPeripheral\Binary'
Make sure each file is included.
File for Central: 「FP-AUD-BVLINKWB1_Central.bin」
File for Peripheral: 「FP-AUD-BVLINKWB1_Peripheral.bin」

○ Connect to PC and download software
When downloading software, set up the board as follows in advance. Also, please note that the settings here will be different when downloading software and running the demo. You can rest assured that even if you make a mistake, the board will not be damaged.
- For jumper JP1*, set the jumper pin to "USB STL"
- Connect the PC and STM32WB Nucleo board to the Micro-USB cable with the "ST-LINK" connector (be careful, there are two Micro-USB connectors)
*Jumper JP1: Jumper for selecting the 5V power supply source of the board.


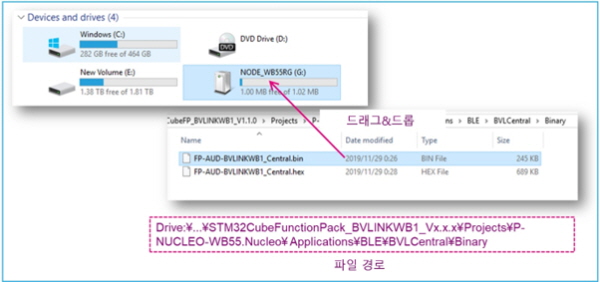
When you connect the STM32WB Nucleo board to your PC with a USB cable, it will be recognized as a USB memory device named 'NODE_XXXX'. (If this is your first time doing this, driver installation will start first.)
For the two STM32WB Nucleo boards, drag and drop the binary files for Central/Peripheral that you checked earlier onto 'NODE_WB55RG' respectively.
This will complete the software download to your STM32 microcomputer.
Download the first xxx_Central.bin
</div>

2nd generation xxx_Peripheral.bin record

○ Change jumper settings during operation
Before running the demo, set up the board as follows: As I mentioned once when I was writing the software, please note that the settings here will be different when downloading the software and running the demo.
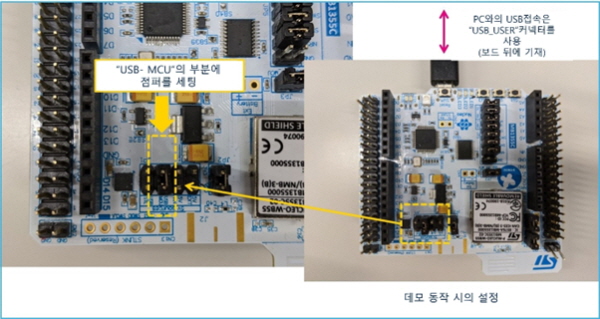
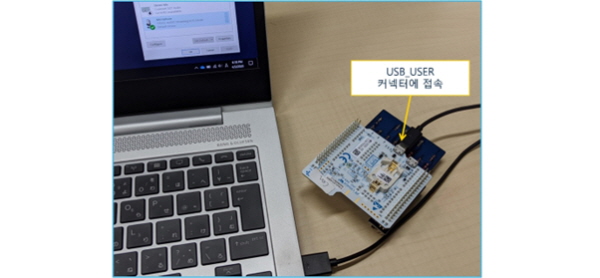
- For jumper JP1*, set the jumper pin to "USB_MCU" (supply 5V from the "USB_USER" connector)
- Connect the PC and STM32 Nucleo board to the "USB_USER" connector with a Micro-USB cable (be careful, there are two Micro-USB connectors)
*Jumper JP1: Jumper for selecting the 5V power supply source of the board.

■ Board Connection
○ Change the interface line settings in the microphone expansion board
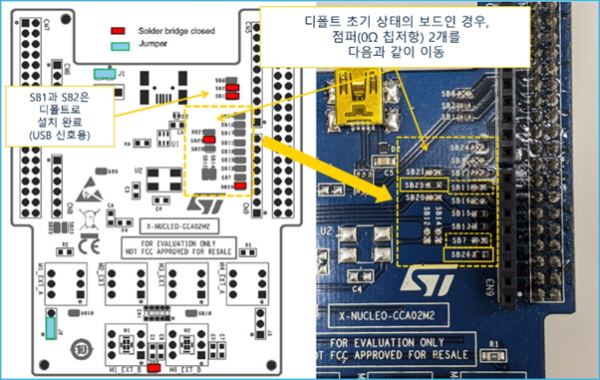
I'm combining the X-NUCLEO-CCA02M2 MEMS microphone expansion board with the STM32WB Nucleo board, but before that I'll change two lines for the microphone interface for this demonstration software (change the jumpers (0Ω chip resistors)).
Since we are assuming connection to a standard STM32 Nucleo board by default, we need to match the microphone port on the STM32WB Nucleo board used in this demonstration.
The demonstration uses the "M1" microphone. Connect the PDM data line and clock line for the microphone to the PA10 and PA8 ports of the STM32WB, respectively. Specifically, move the following two jumpers.
SB11 --> SB25(MIC_PDM12)=STM32WB_PA10(SAI1_PDM_DI1)
SB7 --> SB26(MIC_CLK_NUCLEO)=STM32WB_PA8(SAI1_PDM_CK2)
For SB1 and SB2, this is not required (it is already shorted by default), but is required if you use the USB connector on the microphone expansion board.

○ Board assembly
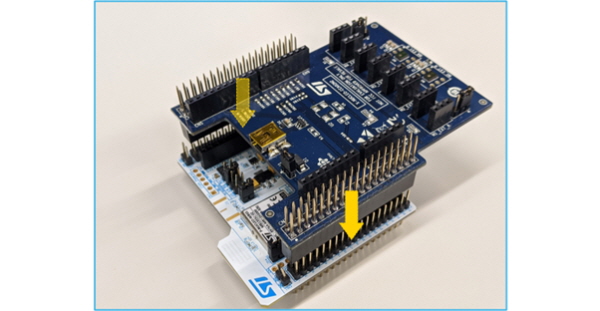
Once the jumper changes are complete, connect the MEMS microphone expansion board to the STM32WB Nucleo board as shown in the figure. Connect using CN7 and CN10 connectors. Please pay attention to the direction.

Once both the Central side and the Peripheral side devices are completed, move on to the next step.
■ PC side settings
○ Connect the board to the PC
Next, connect the previously completed board to the PC and set it up so that it can be recognized by a microphone.
First, for a single device, connect to the PC via USB. Use the "USB_USER" connector on the board side.

○ Device recognition
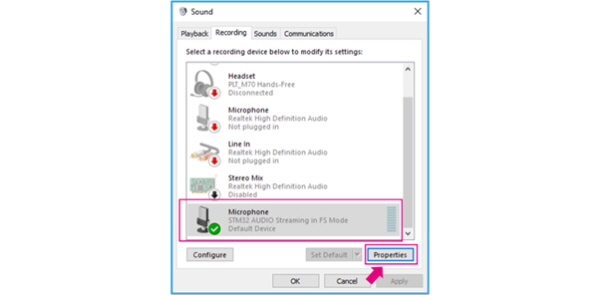
If the board is recognized by USB normally, it will be recognized as a "microphone" (voice input device), so check that first.
Open the Control Panel by entering characters such as "contro" in the search box at the bottom left of the desktop screen.
If you click on “Sound” among these, the sound properties will open. Here you will see a device named "STM32 AUDIO Streaming FS Mode", so select it and click "Properties".

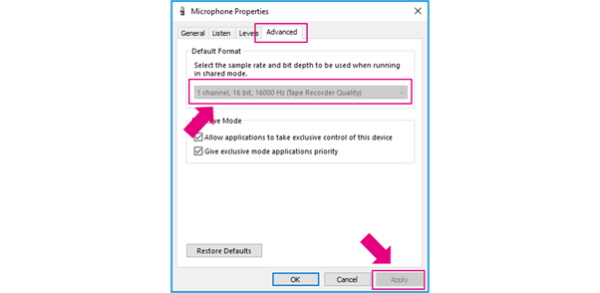
An item to select the input format will appear in [Default Format] ([Advanced/Detailed] tab in the image below), so select “1 channel, 16bit, 16000Hz” and click “Apply.”

Please perform the settings up to this point on each PC of the Central and Peripheral devices.
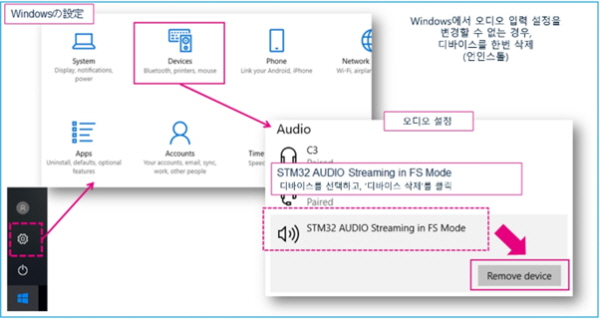
If this setting is not set (there is no [Advanced/Detailed] tab), please do the following.
1. Open “Devices” from “Settings” above the Start button in Windows 10.
2. “STM32 AUDIO Streaming FS Mode” is recognized as an audio device, so delete it (uninstall).
3. Disconnect the device from the PC once, then reconnect it.
4. The device will start installing again on the PC side, so wait until it is complete.
5. After Ready, open the sound properties again.

Once the microphone input settings on the PC side are complete, move on to checking the operation.
○ Additional explanation
You can also use the USB-Mini connector on the microphone expansion board by setting JP1 to "5V_EXT". In this case, short SB2 and SB4 on the back of the STM32WB Nucleo board.
■ Check operation
Connect the Central and Peripheral devices to each of the two PCs. When both devices are powered on, they will automatically connect to Bluetooth. When the connection is completed normally, the LED will change from green flashing to blue flashing.
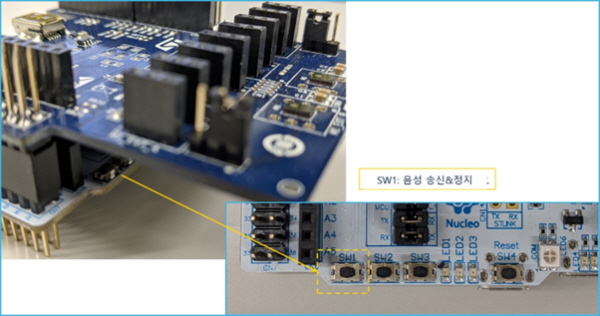
It doesn't matter which board you use, but for example, if you press the SW1 button on the STM32WB Nucleo board on the Peripheral side, voice transmission will start from the Peripheral board to the Central board. At this time, the blue LED will blink rapidly.

When you speak into the microphone, your voice will be heard from the speakers of the PC to which the other STM32WB Nucleo board is connected.

In this state, if you press the SW1 button on the Central side, the Central side can also transmit voice, allowing simultaneous calls. If you press the SW1 button again, voice transmission will stop. This operation can be performed independently on any device.
How is it?
ST has been preparing for voice transmission using Bluetooth LE for some time, and the FP-AUD-BVLINKWB1 file downloaded this time also includes software that can transmit 48KHz stereo audio.
※ Related information
If you would like to know more/try using it, please refer to the related information below.
본 기사에 대한 정정·반론·추후보도 청구는 보도 청구 안내를, 그간 게재된 보도문은 정정·반론보도 모아보기를 참고해 주세요.
명세환 기자
명세환 기자