

[Series] ST Engineer Yuji Kawano (30) - Testing the Sigfox Evaluation Environment Using the STM32 Microcomputer Development Board (2)
 Published2023.06.07 08:44
Verify transmission and reception through Devkit registration
Sensor demonstrations are also available after registration is complete.
 ■ Register Sigfox device
If you have prepared the Sigfox ID and PAC (Authorization Code), the next step is to visit Sigfox.buy and register the Devkit (register the device).
If you already have a Sigfox account, such as through registration on the second device or later, log in first.
Start registration in 'Activate my DevKit'.
.jpg)
If you do not have a Sigfox account, first select 'Sigfox Operator'.
Here, select 'Japan' and click Next to proceed to the next step.
width: 600px; height: 361px;" />
For reference, the Japanese operator is Kyocera Communication Systems.
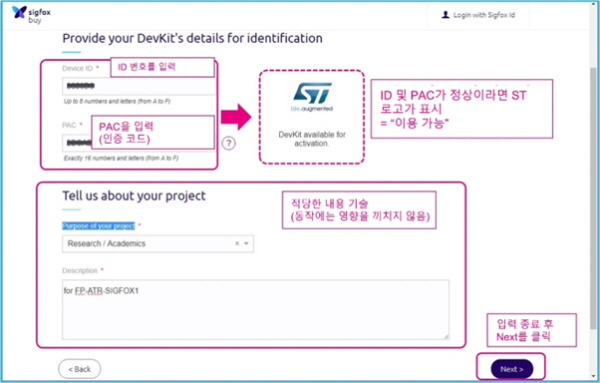
On the next page, enter the ID and PAC obtained from the previous post.
If you do not enter something in the 'Tell us about your project' section below, you will not proceed to the next step.
However, since this has absolutely no effect on the operation, select the appropriate option in 'Purpose of your project' and write suitable content where 'Description' is located.
Once you have finished all the input, click Next to proceed to the next step.
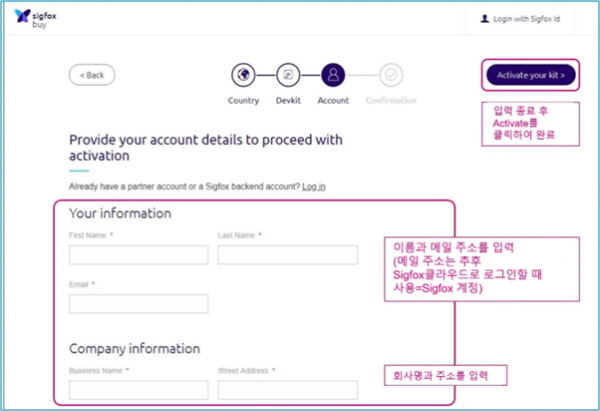
If you start without logging in initially, the following account creation page is displayed. If you are new, enter your account information here.
- name
- Email address
- Company Name and Address
Enter the information and check the box next to 'I have read, understood and agree to the Terms & Conditions'. First, click 'Activate your kit'.
The entered company name is set as the 'group name' within the Sigfox cloud.
If the same group name (company name) is used, an error will occur, so use a different name. The email address becomes the account entered when logging into the Sigfox cloud.
If 'Congratulations!' is displayed as shown below, the registration has been successfully completed.
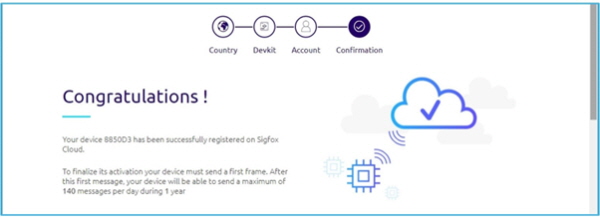
With that, device registration is complete.
Next, I will actually verify this on the Sigfox cloud.
○ Register account password
You must set a password before accessing the Sigfox cloud. An instruction email will arrive at your registered email address, so please set your password there.
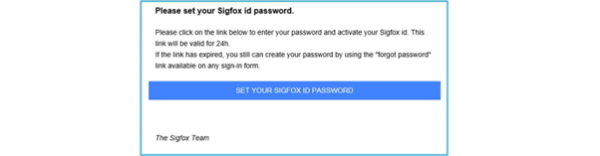
Once the setup is complete, you will be able to log in to the Sigfox cloud.
■ Preparatory steps in the Sigfox cloud
Log in to the Sigfox cloud and configure the download link settings.
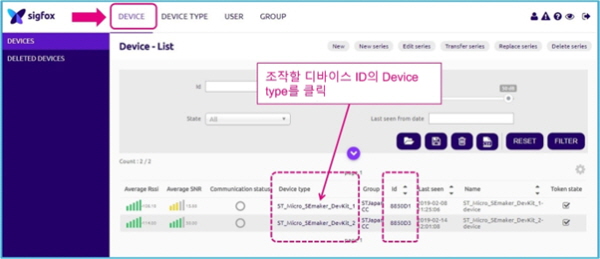
First, click the 'DEVICE' tab at the top of the page to open it. Since the previously registered device is recognized in the 'ID' column, click the 'Device type' of the device ID to be operated.
Next, on the 'DEVICE TYPE' → 'INFORMATION' page, click 'Edit' at the top right to go to the edit page.

Set the mode to 'DIRECT' where 'Downlink Data' is located in the center, then click 'OK'.
You can also edit the Downlink data as needed.
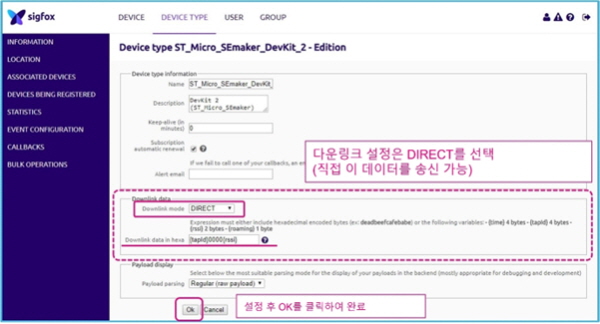
This completes the setup.
Return to the 'DEVICE' page, click the target device ID, and then click 'MESSAGES' on the left tab to proceed to the message sending/receiving status check page (at this stage, no messages have arrived yet).: center;">
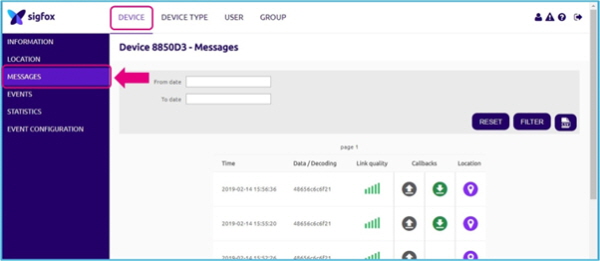
With this, the Sigfox cloud setup is complete.
Leave the message confirmation page as is, and proceed with the next steps in the S2-LP SigFox DK.
■ Confirmation of transmission/reception
○ Uplink (Upload data. Data transmission from device to server)
Restart S2-LP_SigFox_DK. (It is located under the 'STMicroelectronics' folder in Windows 'Start'.)
.jpg)
Just like when registering, select and open the COM port.
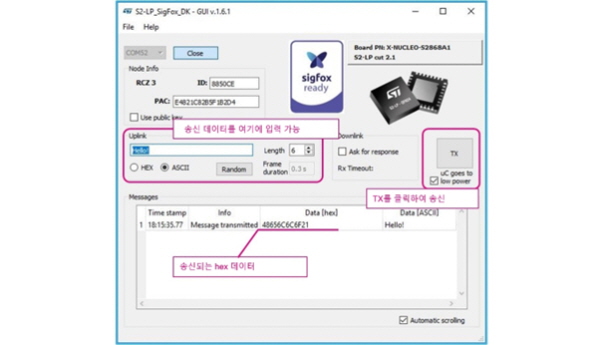
Edit the data content in the 'Uplink' input field and click 'TX' to send it to the Sigfox cloud.
Here, string data (6 Bytes) of 'Hello!' is transmitted, which is '48656C6C6F21' in ASCII hexadecimal.
Check later in the Sigfox cloud whether this figure was transmitted correctly.
○ Download link (Download data. (Sending data from server to device)
To receive data, the device must first transmit it.
Perform 'transmission & reception' as a set.
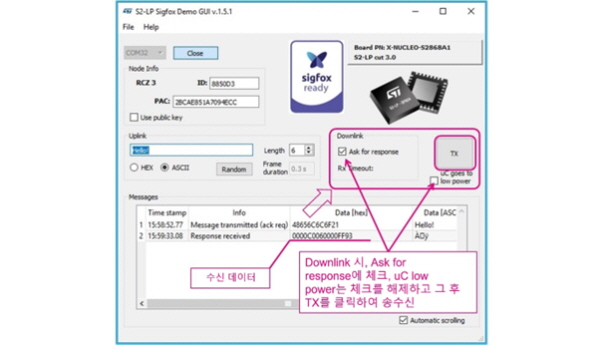
Check 'Ask for response' where 'Downlink' is located, uncheck 'uC goes to low power', and click 'TX'.
The data recorded in the 'Data[hex]' column of 'Response received' in the figure below is the data transmitted from Sigfox. The Downlink data configured in the Sigfox Cloud, as explained in 'Preparation in Sigfox Cloud' of this post, is transmitted here.
The default setting of the Sigfox cloud is {Default State ID (4 Bytes)}+{0000 (2 Bytes)}+{rssi (2 Bytes)}. In the test environment, data '0000C006 + 0000 + FF93' is transmitted.
○ Was it transmitted and received properly?
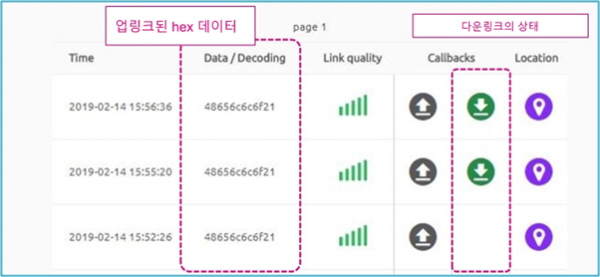
Return to the Sigfox cloud page and check the 'MESSAGES' page to verify that the transmission was successful. The Date/Decoding column contains the data sent from the device. Since it is set to '48656C6C6F21', it was transmitted correctly.
The status of the download link can be checked using the icon on the right. If it turns green, the Downlink has been successfully transmitted. You can also view detailed information by clicking the icon.
How is it? With this, Sigfox registration and data transmission/reception have been confirmed.
Once Sigfox registration is complete, a separate sensor demonstration (a demonstration transmitting temperature, humidity, and pressure data. FP-ATR-SIGFOX1) is also available, so please try using this as well.

Comments
Related news
.jpg)
[Serial] ST Yuji Kawano, Engineer (27) - Using a GNSS Module, Challenge Map Tracking! - GUI Edition (Settings Change 2)
MCUs are unfamiliar compared to CPUs or GPUs, yet they are among the most widely used semiconductors. Let's hear from Yuki Kawano, Manager at ST System Solutions Lab, about the versatility and potential of MCUs.
2023.02.28by 명세환 기자

[Serial] ST Yuji Kawano, Engineer (28) - Using GNSS Modules to Challenge Map Tracking! - GUI Edition (3)
Microcontrollers are unfamiliar compared to CPUs or GPUs, but they are among the most widely used semiconductors. Let's hear from Yuki Kawano, Manager at ST Systems Solutions Lab, about the versatility and potential of microcontrollers.
2023.04.17by 명세환 기자
.jpg)
[Series] ST Engineer Yuji Kawano (29) - Testing the Sigfox Evaluation Environment Using the STM32 Microcomputer Development Board (1)
MCUs are unfamiliar compared to CPUs or GPUs, yet they are among the most widely used semiconductors. Let's hear from Yuki Kawano, Manager at ST System Solutions Lab, about the versatility and potential of MCUs.
2023.05.22by 명세환 기자
Intel Unveils Next-Generation 'Core Ultra Series 3' and vPro Platform for Enterprise PCs
Intel has officially unveiled the "Intel Core Ultra Series 3" for next-generation enterprise PCs and the latest vPro platform, addressing a wide range of demands from enterprise notebooks to high-performance workstations.
2026.03.26by 배종인 기자
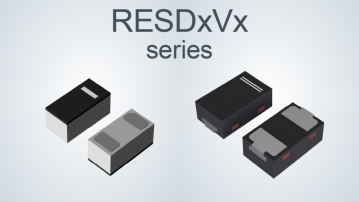
ROHM Launches ESD Protection Diode Compatible with High-Speed Interfaces of 10Gbps or Higher
Semiconductor specialist ROHM has developed the 'RESDxVx series' of ESD (electrostatic discharge) protection diodes capable of responding to next-generation high-speed data communication environments exceeding 10Gbps, simultaneously enhancing both signal quality maintenance required in high-speed interfaces and IC protection performance.
2026.03.26by 배종인 기자